

Bed new brake pads with a controlled, repeated-stop sequence such as the 30-30-30 method, performed in a safe area away from traffic, to build a uniform transfer film and stabilize braking performance. Expect reduced stopping power during the process, with full stabilization developing over the first 400 to 500 miles of driving. If you own a tuned, high-performance, or complex European vehicle, or you notice persistent noise or pulsation afterward, a professional inspection is the safer next step.
TL;DR:
- Before driving, confirm pad hardware and caliper torque, clean rotor faces, check brake system fault codes, and inspect rotors for damage and adequate thickness.
- On dry pavement, warm the brakes, then make 30 stops from 30 mph to 5 to 10 mph, allowing 30 seconds between applications without stopping.
- If a safe 30 mph route is unavailable, do sets of 8 to 12 lower speed stops, cooling between sets without holding the brakes stationary.
- After the sequence, let the brakes cool for 20 to 30 minutes, then drive moderately for 400 to 500 miles as full conditioning develops.
- Repeat the full bedding sequence after installing new or resurfaced rotors, even with reused pads, and follow the pad maker’s instructions for performance compounds.
Table of Contents
- Step-by-step brake bedding procedure for new pads and rotors
- Why brake bedding matters for friction and pad life
- How to verify your brakes are properly bedded
- Do you need to re-bed brakes after a rotor change?
- Safety steps and troubleshooting after bedding
- Best conditions for a bedding run
- How brake pad type changes the bedding process
- Common mistakes that ruin a bedding attempt
- Maintaining brake performance after bedding
- Inspecting pads and rotors before you start
- Why a dealer-level shop approach adds value here
- Schedule professional brake service and bedding
- FAQ
- Sources
Step-by-step brake bedding procedure for new pads and rotors
Getting this right starts before you ever leave the driveway. A rushed setup undoes even a textbook stop sequence, so work through preparation first.
Preparation checklist:
- Confirm pad hardware, shims, and anti-rattle clips are seated correctly, and remove any transport clips or stickers from new pads by following detailed advice on pad shims and squeal.
- Torque wheel lugs to the manufacturer’s specification and double-check caliper bolt torque.
- Clean rotor faces of oil, rust inhibitor, or packaging residue if you are reusing or installing new rotors.
- Clear the work area of loose debris that could get pulled into the caliper or rotor surface.
- Verify there are no active ABS or brake system fault codes before you drive.
Once the car is ready, find a straight, low-traffic road or empty lot where you can safely reach highway-adjacent speeds and brake hard without other vehicles nearby. Warm the brakes gradually with two or three moderate stops from around 20 to 25 mph before starting the main sequence. This brings the pads and rotors up to a working temperature range without shocking cold components.
Primary bedding sequence (30-30-30 method):
- Accelerate to approximately 30 mph.
- Apply firm, steady brake pressure to slow the vehicle to around 5 to 10 mph, avoiding a complete stop.
- Release the brakes and accelerate back to speed, allowing roughly 30 seconds of cooling airflow between applications.
- Repeat this stop-and-cool cycle for a total of about 30 repetitions, per ADVICS bedding guidance.
If you are working in a tighter urban area where sustained 30 mph runs are not practical, a progressive alternative works nearly as well: run sets of 8 to 12 stops from a lower speed, pausing between sets to let the brakes cool before building intensity on the next set. The goal in either approach is the same: repeated heat cycles that deposit an even friction layer without ever letting the pads cool completely between applications or come to a full, held stop.
Avoid locking the brakes to a complete stationary hold during this process. Holding pressure at a standstill concentrates heat in one spot on the rotor and can create uneven transfer deposits that show up later as pedal pulsation. For the same reason, skip hard, panic-style stops until the sequence is finished.
Pro Tip: Keep a slightly longer following distance than usual during bedding runs. You need room to modulate pressure smoothly rather than stab the pedal if traffic appears unexpectedly.
After the final cycle, park the car and let the brakes cool fully, ideally 20 to 30 minutes with the wheels off the ground or in open air, before inspecting your work. Check that rotor surfaces show an even, light gray or bluish discoloration rather than blotchy dark spots, and confirm lug torque one more time now that the wheels have cycled through heat expansion.
Finish with a short progressive test drive at normal street speeds, checking for a firm pedal and even deceleration. For the next 400 to 500 miles, drive moderately and avoid aggressive or repeated hard braking, since full conditioning of the pad and rotor surfaces continues to develop over that distance.
Why brake bedding matters for friction and pad life
Every rotor and pad pairing needs a thin, even layer of transferred pad material, known as the transfer film, bonded to the rotor face before braking performance becomes predictable. Research into copper-free NAO pads found this film is primarily iron oxide drawn from the rotor itself, and that the pad’s filler composition affects how uniformly that film forms and holds up under heat.
Dynamometer testing on a copper-free friction material found that the friction coefficient typically stabilizes after about 150 stops, while wear and particulate emissions from the system take longer to settle, often several hundred stops. That staged timeline is why a single bedding session gets you most of the way there, but full conditioning still continues over normal driving.
In practice, a properly bedded system means fewer vibrations at the pedal, less brake dust noise, and a pedal that feels the same every time you press it, rather than grabby one day and soft the next.
How to verify your brakes are properly bedded
A few checks confirm the work is done right:
- Pedal feel is firm and consistent across repeated stops, with no sponginess or sudden grabbing.
- Rotor faces show a uniform, light-colored transfer layer rather than dark blotches or a glazed, glassy sheen.
- There is no unusual squeal, grinding, or pulsation during moderate stops.
Transfer film composition drives this consistency. Research into copper-free NAO pads frames stable friction as the result of a well-formed transfer film and secondary plateau on the pad surface, which is exactly what a correct bedding sequence builds.
If something feels off, a short 3 to 5 stop diagnostic test from moderate speed can help isolate whether squeal or inconsistent pedal feel traces back to contamination, hardware, or incomplete bedding, and whether a re-inspection is warranted.
Do you need to re-bed brakes after a rotor change?
Yes. Any time you install new or resurfaced rotors, even with your original pads, the bedding procedure needs to happen again. Clean the rotor faces of machining residue or shipping coating first.
Old transfer film carried over from a prior pad can create high spots on a fresh rotor surface, leading to a slip-grip pattern and noticeable vibration almost immediately, a risk ADVICS specifically warns against. Run the full 30-30-30 sequence for a new rotor and pad pairing; if only the rotors changed and pads are reused, the same full sequence still applies since the rotor surface is starting fresh.
Safety steps and troubleshooting after bedding
A few symptoms call for immediate attention rather than continued driving:
- Soft or sinking pedal, visible smoke, or a strong burning smell mean you should stop driving and have the system checked before continuing.
- Vibration or pulsation after bedding often traces back to contamination, uneven lug torque, or a rotor that has not fully seated.
- Persistent squeal, uneven pad wear, or pulsation that does not improve over the first few hundred miles points to a shop diagnostic rather than another bedding attempt.
Pro Tip: If the pedal ever feels inconsistent mid-sequence, stop the bedding run, let the brakes cool completely, and reassess before continuing rather than pushing through it.
A quick diagnostic check for soft pedal symptoms can rule out simpler causes before assuming the bedding itself was the problem.
Best conditions for a bedding run
Dry pavement matters more than any other single factor. Wet roads reduce the friction you need to build heat into the pads and rotors, and they add stopping-distance risk during a procedure that already involves repeated hard braking.
Moderate ambient temperatures help too. Very cold weather means components take longer to reach a working temperature, which can stretch out the number of stops needed to get consistent results, while extreme heat leaves less thermal margin if you need to pause and let the system recover. A mild, dry day with a straight, open road and little traffic gives you the most control over speed, spacing, and cooling time between stops.
Avoid bedding brakes in stop-and-go traffic or in a parking lot too small to reach a safe speed. You need enough distance to accelerate smoothly, brake firmly, and coast before repeating the cycle, and you need a clear sightline so an unexpected hazard does not force a panic stop mid-sequence.
If local conditions will not cooperate for a few days, it is reasonable to drive conservatively on the new parts until a proper bedding window opens, since gentle driving will not damage anything, it simply delays full stabilization.
How brake pad type changes the bedding process
Not every pad compound behaves the same way during bedding, which is why checking your specific pad’s instructions matters as much as following a general rule.
Ceramic pads tend to build their transfer layer gradually and respond well to the standard 30-30-30 sequence, with a relatively forgiving heat range. Semi-metallic pads generate heat faster and can call for slightly more spacing between stops to avoid overheating during the bedding run itself. Copper-free NAO pads, increasingly common as manufacturers phase out copper content, rely heavily on the iron-oxide transfer film described in SAE research, and filler composition in these pads can affect how evenly that film forms.
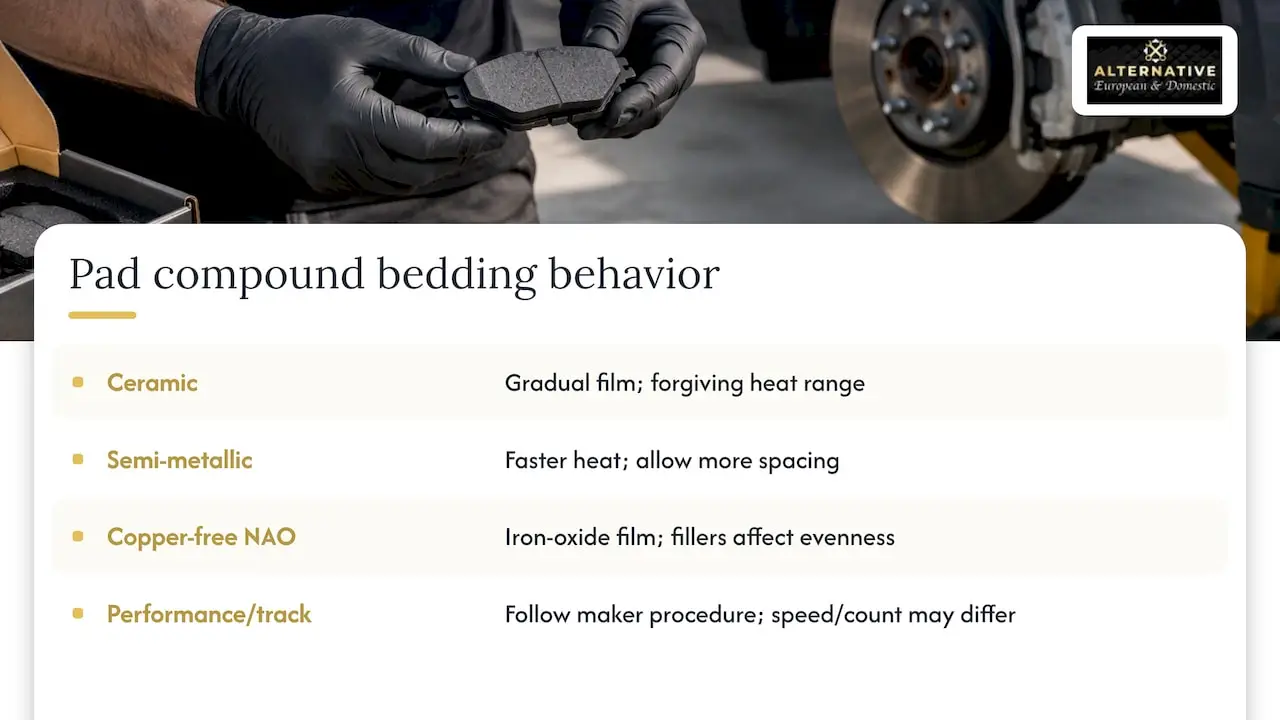
Performance or track-oriented pad compounds, common on tuned European and high-output vehicles, often specify their own bedding procedure from the manufacturer, sometimes with higher target speeds or a different stop count. Always default to the pad manufacturer’s written procedure when one is provided, since compound chemistry varies enough that a generic sequence is a reasonable fallback, not a universal rule.
Common mistakes that ruin a bedding attempt
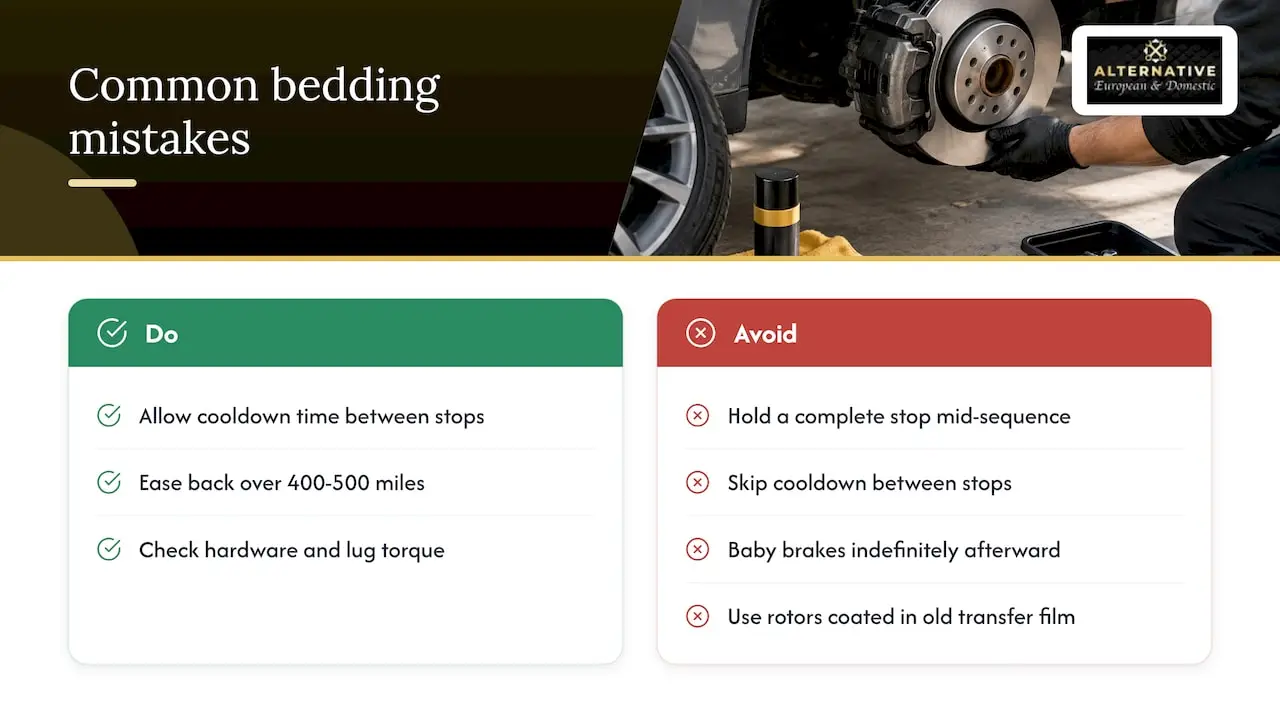
The most frequent error is coming to a complete, held stop during the sequence instead of slowing to a rolling pace before accelerating again. A held stop concentrates heat in one spot on the rotor and plants the seed for pulsation down the road.
Rushing the process is another common issue: skipping cooldown time between stops does not speed up bedding, it just overheats the pads and can glaze the surface instead of building a clean transfer film. On the flip side, driving too gently afterward, babying the brakes indefinitely rather than easing back into normal use over the recommended 400 to 500 miles, can leave the system under-conditioned.
Installing new pads against rotors still coated in old transfer film is another mistake worth avoiding, since mismatched surfaces rarely bed evenly no matter how carefully you run the stop sequence. Finally, skipping the hardware check, loose shims, uneven lug torque, or a caliper slide that needs lubrication, can mimic a bad bedding job when the real cause is mechanical.
Maintaining brake performance after bedding
Once bedding is complete, a few habits keep that performance consistent. Check pad thickness and rotor condition at routine maintenance visits rather than waiting for a warning sign, since catching wear early avoids the uneven rotor surfaces that complicate future bedding. Keep an eye on brake fluid condition as part of regular service, since contaminated or aged fluid affects pedal feel independent of how well the pads are bedded.
Avoid habitually riding the brakes on long downhill stretches, which reheats the pad surface repeatedly and can accelerate wear even after a proper break-in. If you tow, carry heavy loads, or track the car, watch for earlier wear patterns and plan replacement intervals accordingly, since those use cases shorten the window between services on performance and European platforms.
Inspecting pads and rotors before you start
A short inspection before bedding saves you from chasing symptoms that trace back to a part problem rather than the procedure itself. Check rotor surfaces for scoring, cracking, or a lip at the outer edge, any of which suggest the rotor should be addressed before new pads go on. Measure rotor thickness against the minimum specification if you have access to a micrometer or have a shop check it.
Inspect new pads for consistent friction material thickness and confirm the backing plate and shims match the application. Confirm caliper pistons move freely and slides are lubricated, since a dragging caliper will overheat one pad unevenly during the bedding run and skew your results. This inspection takes a few extra minutes and prevents a flawed bedding attempt from masking a mechanical issue that needed attention first.
Why a dealer-level shop approach adds value here
We approach brake bedding the same way a dealer service department does: confirming hardware torque, rotor condition, and ABS status before the car ever leaves the bay, with particular attention to European and high-performance platforms. When a 3 to 5 stop diagnostic test points to something beyond a bedding issue, dealer-level diagnostics help pinpoint it accurately rather than guessing. Confident owners can absolutely handle bedding themselves; we are here when a tuned or complex vehicle calls for a second set of eyes.
Schedule professional brake service and bedding
If you would rather have a technician handle bedding, torque checks, and a post-install inspection, we provide dealer-level brake pad replacement and brake service for European, domestic, and high-performance vehicles in our shop.

- Hardware torque, rotor condition, and ABS status should be confirmed before a car leaves the bay.
- A proper bedding sequence and post-service test drive are recommended before returning the vehicle.
- Clear communication about findings and work performed is important to avoid surprises on the invoice.
Schedule an appointment with us and we will take care of the rest.
FAQ
How long does the brake bedding process take?
The active bedding sequence itself, such as 30-30-30, typically takes several minutes to complete. Full conditioning of the pad and rotor surfaces continues over the next 400 to 500 miles of normal driving.
How do you know if your brakes are bedded?
Properly bedded brakes deliver a firm, consistent pedal feel with no grabbing, fading, or sponginess across repeated stops. Rotor faces should show an even, light-colored transfer layer rather than dark blotches or a glazed surface.
What does the 30-30-30 rule mean when bedding-in brakes?
The 30-30-30 rule refers to performing roughly 30 stops from about 30 mph, with about 30 seconds of cooling between each stop. It builds an even transfer film on the rotor without letting the system overheat or cool completely between applications.
Do pads need to be bedded again after changing rotors?
Yes, installing new or resurfaced rotors requires a full bedding sequence even if you reuse the original pads. Old transfer film carried over from before can create high spots on the fresh rotor surface and cause vibration if the surfaces are not conditioned together again.
What should I do if I notice vibration after bedding?
Vibration after bedding is often caused by uneven lug torque, rotor contamination, or a rotor that has not fully seated during the process. If it persists after a careful re-check, a brake diagnostic inspection can isolate the cause before it worsens.
Sources
- ADVICS HOW TO: Bedding-In Brake Rotors & Brake Pads
- A study of friction, wear and particulate emissions during the bedding stage of a Cu-free friction material
- Transfer Film Composition and Characteristics in Copper-Free NAO Brake Pads